Ever recorded something important… only to replay it and realize it sounds like it was captured from inside a backpack? Yeah, not ideal.
If you’re using the Samsung Galaxy S24 and wondering how to change voice recorder recording quality, you’re in the right place. Whether you’re recording lectures, work meetings, interviews, or your next viral podcast idea, getting the right audio quality makes a huge difference.
The good news? It only takes a few taps. Let’s walk through it.
Can You Change Recording Quality on Samsung Galaxy S24?
Short answer: Yes — but it depends on the recording mode you’re using.
The built-in Voice Recorder app on the Galaxy S24 offers different recording modes that affect audio clarity, file size, and how microphones are used.
You’ll typically see options like:
- Standard Mode – Balanced quality for everyday use
- Interview Mode – Uses multiple microphones for clearer voice separation
- Speech-to-Text Mode – Records audio while transcribing in real time
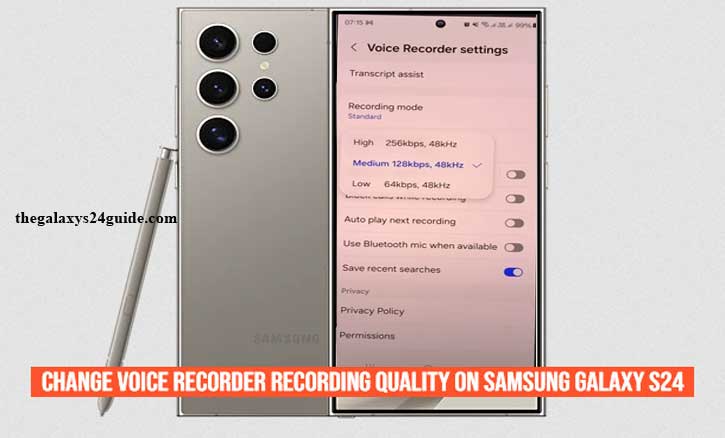
In some versions of the app, you may also see quality adjustments like bitrate control (Low, Medium, High). Higher quality usually means clearer sound — but larger file sizes.
Let’s get into the exact steps.
How to Change Voice Recorder Recording Quality on Samsung Galaxy S24
Follow these steps carefully. It’ll take less than a minute.
Step 1 – Open the Voice Recorder App
- Swipe up to open your App Drawer
- Tap Voice Recorder
- Or just type “Voice Recorder” in the search bar
If you can’t find it, it may be inside the Samsung folder by default.
Step 2 – Access the Settings Menu
- Tap the three-dot menu in the top-right corner
- Select Settings
This is where the magic happens.
Step 3 – Adjust Recording Quality or Mode
Depending on your software version, you may see options like:
- Recording Quality
- Audio Format (M4A / WAV)
- Recording Mode
If you see quality levels:
- Low Quality – Smaller files, lower clarity
- Medium Quality – Good balance
- High Quality – Best clarity, larger file size
If bitrate isn’t directly adjustable, you can improve quality by switching modes:
- Interview Mode for clearer voice capture
- Standard Mode for general use
- Speech-to-Text Mode if you need transcription
Pro tip: WAV files are higher quality but much larger than M4A.
Step 4 – Test Your New Settings
Record a short 10-second sample.
- Play it back with headphones.
- Compare clarity.
- Check file size.
You’ll instantly hear the difference if you switched to higher quality.
Best Recording Quality Setting for Different Situations
Not all recordings are created equal. Here’s what works best.
For Work Meetings
Use Interview Mode.
It captures voices from different directions more clearly, especially across a table.
For Interviews or Podcasts
Choose High Quality (if available) and record in a quiet room.
If possible, use WAV format.
For Classroom Lectures
Standard Mode usually works fine.
If you’re far from the speaker, place the phone screen-up on a desk.
For Music or Ambient Sounds
Switch to High Quality and avoid covering the microphone.
Music needs more audio detail than speech.
Why Your Samsung Galaxy S24 Recording Quality May Not Change
If you don’t see quality options, here are possible reasons:
1. App Version Limitations
Some updates simplify settings. Make sure your Voice Recorder app is updated.
2. Storage Almost Full
High-quality recording needs space. If your storage is low, some options may be limited.
3. Using a Different Recording App
Third-party apps have their own settings. Make sure you’re adjusting the correct app.
4. Software Glitch
Try restarting your phone. Classic fix — still works in 2026.
Does Higher Recording Quality Use More Storage?
Yes. Always.
Here’s a rough idea:
- Low Quality – ~5–7 MB per 10 minutes
- Medium Quality – ~10–15 MB per 10 minutes
- High Quality (WAV) – 50–100+ MB per 10 minutes
If you’re recording long lectures daily, that adds up fast.
But for interviews or important content? Totally worth it.
Hidden Tips to Get Better Audio on Samsung Galaxy S24
Changing quality settings helps — but technique matters more than people realize.
Here’s how to level up your recordings:
Remove Thick Phone Cases
Some rugged cases partially block microphones.
Use Airplane Mode
Prevents notification interference mid-recording.
Clean the Microphone Area
Dust affects clarity more than you’d think.
Mind the Distance
Keep the phone 6–12 inches from the speaker.
Consider a USB-C External Mic
If you’re serious about audio (podcasting, YouTube, interviews), this makes a noticeable difference.
Voice Recorder vs Third-Party Apps – Should You Switch?
The default Samsung Voice Recorder app is solid for most users.
But if you need:
- Manual bitrate control
- Professional editing
- Noise reduction filters
- Multi-track recording
You may want to explore third-party recording apps.
For everyday meetings and lectures though? The built-in app is more than enough.
Final Thoughts
Changing voice recorder recording quality on your Samsung Galaxy S24 is simple — once you know where to look.
A few taps in Settings can dramatically improve clarity. Combine that with better positioning and recording habits, and your audio will sound noticeably more professional.
So go ahead — test your settings, record a quick sample, and finally retire those “why does this sound like it was recorded underwater?” moments.
If you’re using your Galaxy S24 for productivity, content creation, or school — optimizing audio quality is a small tweak that makes a big difference.
Frequently Asked Questions
Where are Voice Recorder files stored on Samsung Galaxy S24?
Go to:
My Files → Internal Storage → Recordings → Voice Recorder
You can also access them directly inside the app.
Can I record in MP3 or WAV format?
Most versions support M4A and WAV.
WAV offers higher quality but larger file size.
Why does my recording sound muffled?
Common causes:
- Microphone blocked
- Phone too far from speaker
- Recording in low quality
- Background noise
Switch to Interview Mode and test again.
How do I improve microphone sensitivity on Galaxy S24?
There’s no manual sensitivity slider in the default app.
The best improvement comes from:
- Using proper recording mode
- Recording closer to the sound source
- Using an external microphone